No Title
Course messages are private and secure text-based communication that occurs within your course among course members. Learn more (student): https://help.blackboard.com/Learn/Student/Interact/Messages Learn more (instructor): https://help.blackboard.com/Learn/Instructor/Interact/Messages https://help.blackboard.com/Learn/Instructor/Interact/Messages/Send_Messages
Similar to Blackboard Email, Messages are internal to Blackboard. The messages tool allows you to easily manage Blackboard communications within your individual Blackboard courses.
Accessing Blackboard Messages
If your instructor uses the Blackboard Messages tool, you should see a link on the course menu along with the other materials provided to you in the course. Messages are internal to Blackboard and, at this time, any communications sent through the Messages system cannot be forwarded outside of the Blackboard system. To access the Messages tool and send a message, click the link on the course menu.
It is also possible to access the messages tool from the Blackboard Base Navigation menu outside of the course, but you should only use this if your instructor has indicated that they prefer to be contacted through Blackboard. Always check the syllabus to make sure you understand your instructor’s preferred method of contact, as some may prefer that you use your UA Little Rock Gmail account to communicate.
Your Message Center
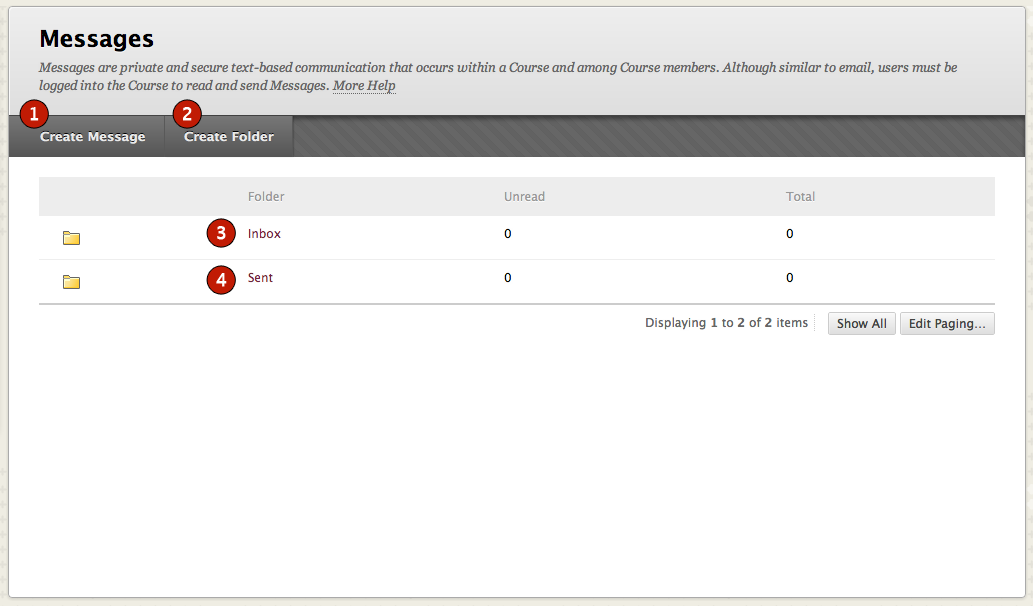
This is the Message Center, where all of your Blackboard Messages will be collected. Messages are course-specific, which means that if you send a Message in one course, that Message cannot be viewed within the Messages area of a different course.
Inside the Message Center
| Reference | Item | Description |
|---|---|---|
| 1 | Create Message | This is where you will go to compose and send your Blackboard Messages |
| 2 | Create Folder | Allows you to add personal folders to organize your Messages |
| 3 | Inbox | Click the Inbox link to check incoming messages |
| 4 | Sent | Click the Sent link to check outgoing messages |
Composing and Sending a Message
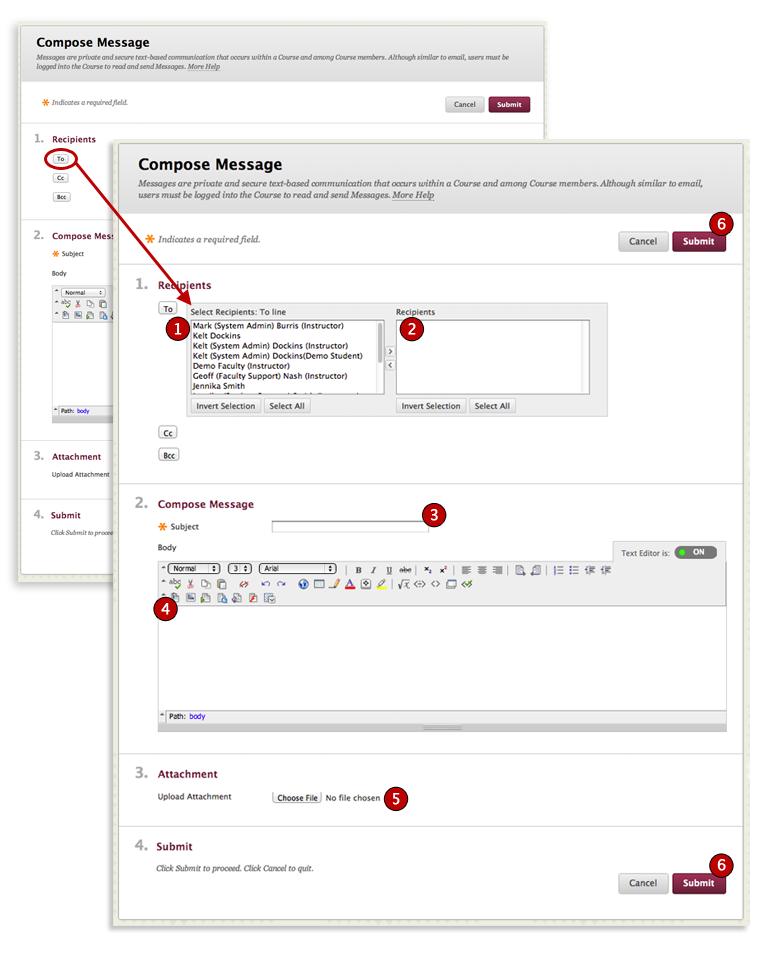
Once you’ve clicked Create Message, the next steps are to choose the recipients, write the message and then send it. Once you send a Message, a copy of the message will be placed in your sent folder. Use the arrows to move recipients on (right arrow) and off (left arrow) the To list. Click Invert Selection and the selected users are no longer highlighted and those users that were not selected will be highlighted. Use the Cc (Carbon copy) and the Bcc (Blind carbon copy) buttons to select recipients the same way.
Once on the Compose Message page:
- Click the To button to access the course participant list.
- Select the recipients and then click the arrow to add them to the message.
- Add a subject to your message.
- Type your message.
- Click Attach a File to browse for files from your computer. In Messages, you can only attach one file per message. In order to send multiple files, you will either have to send multiple messages or send them in a .zip format.
- Click submit to send your message.
Best Practices Using Messages
Communicating with Messages is efficient and effective. Please be mindful of the following best practices when using this tool.
- Provide a greeting
- Keep your message clear and concise
- Use complete sentences
- Check your spelling and grammar
- Quote others when appropriate
- Include a descriptive subject line
- Only use capital letters as necessary as ALL CAPS can be seen as raising one’s voice online
- Sign your name!

