Are you seeing a 3rd party cookie error when attempting to view the Kaltura video in your course? Try this workaround for your desktop browser.
Kaltura Media provides students with options to create video content in a variety of Blackboard tools such as the discussion board, blogs, journals, and other tools. With Kaltura Media, students may upload files, and create webcam recordings, or screen captures in their online courses.
The Kaltura Media tool is a video platform that lets you upload original or create new media through the content editor in online course assignments.
How do I submit a video in Kaltura to the Assignment or Discussion tool?
To submit a video you’ve uploaded to Kaltura in one of your courses, you’ll add it to the submission text box by following the steps outlined in the video that appears under the ‘ Adding multimedia content to your course’ header on this page.
For a discussion post, you’ll simply create a new thread or reply to someone else’s and follow the steps to embed the video into your post.
If you’re submitting to the assignment tool, you’ll need to click the ‘Write Submission’ button to access the text editor.
Once you’ve accessed the text editor for your submission, clicked the ‘Add Content’ button, and selected Kaltura media, you’ll see a pop-up window where you can select from videos you’ve previously uploaded. You can also use the ‘Add New’ button to upload a video, or to use one of Kaltura’s recording tools to create a new video.
Adding Multimedia Content to Your Course
The Kaltura Mashup tool allows you to add a video to your course anywhere that you can type. That means you can add a video to discussion board posts, assignment submissions, messages, or anywhere else you have access to the content editor.
To add a video through the content editor, just click the ‘Add Content’ button (‘plus sign’ icon in the third row of buttons) and select Kaltura Media from the menu.
Adding multimedia to your course
No Description
This will open a pop-up window where you can browse through the My Media or media content associated with your account or add new media.
Creating Multimedia Content using Kaltura Capture Space
Kaltura offers a built-in, free solution for creating video content in your Blackboard course with Kaltura Capture, available through the Add New button in the My Media gallery.
Kaltura Capture Space media recorder
No Description
Kaltura Capture is a compact, easy-to-use desktop recording tool that you can use to capture video from your webcam, create screencasts of your desktop, or record audio from your microphone.
To get started using the desktop recorder, you’ll need to install it on your computer — just follow the on-screen prompts that appear when you select Capture Space from the Add New menu for the first time.
Note that you only have to install the Kaltura Capture desktop recorder tool on your computer once, but if you plan to use the program on multiple computers, you’ll have to install it on each.
Once installed, you’ll be prompted by your browser to launch the program each time you select the Kaltura Capture option from the Add New menu. Click to launch and the Kaltura Capture Recorder will open on your desktop.
Uploading Pre-recorded Media
Though Kaltura offers a number of free solutions for recording multimedia inside your course, you can still upload media you’ve recorded on your own. If you’ve made a video or audio recording using something outside of Kautra — like the video recorder on your smartphone or screen capture software installed on your computer — you can upload the resulting file by selecting the Media Upload option from the Add New menu in the My Media Gallery.
Uploading pre-recorded media
No Description
Before uploading, you’ll need to make sure the file is in one of the following approved formats.
Media File Formats: Mpeg-4 and QuickTime Formats (MP4, MOV, QT, and M4V), Flash Video (FLV and F4V), Microsoft Windows Formats (AVI, ASF, WMV, and WMA), MPEG-1/2 (MPG, M1V, M2V, MP3), WAV, Matroska (MKV), OGG OGM & OGV, WEBM, 3GP, RM, Webex (ARF), MXF
Accessing Kaltura Media
There are many ways to access Kaltura within your Blackboard courses, but you can always view the video content associated with your account by clicking the My Media button that appears within the ‘Tools’ section of Blackboard’s main navigation menu.
Accessing Kaltura Media
No Description
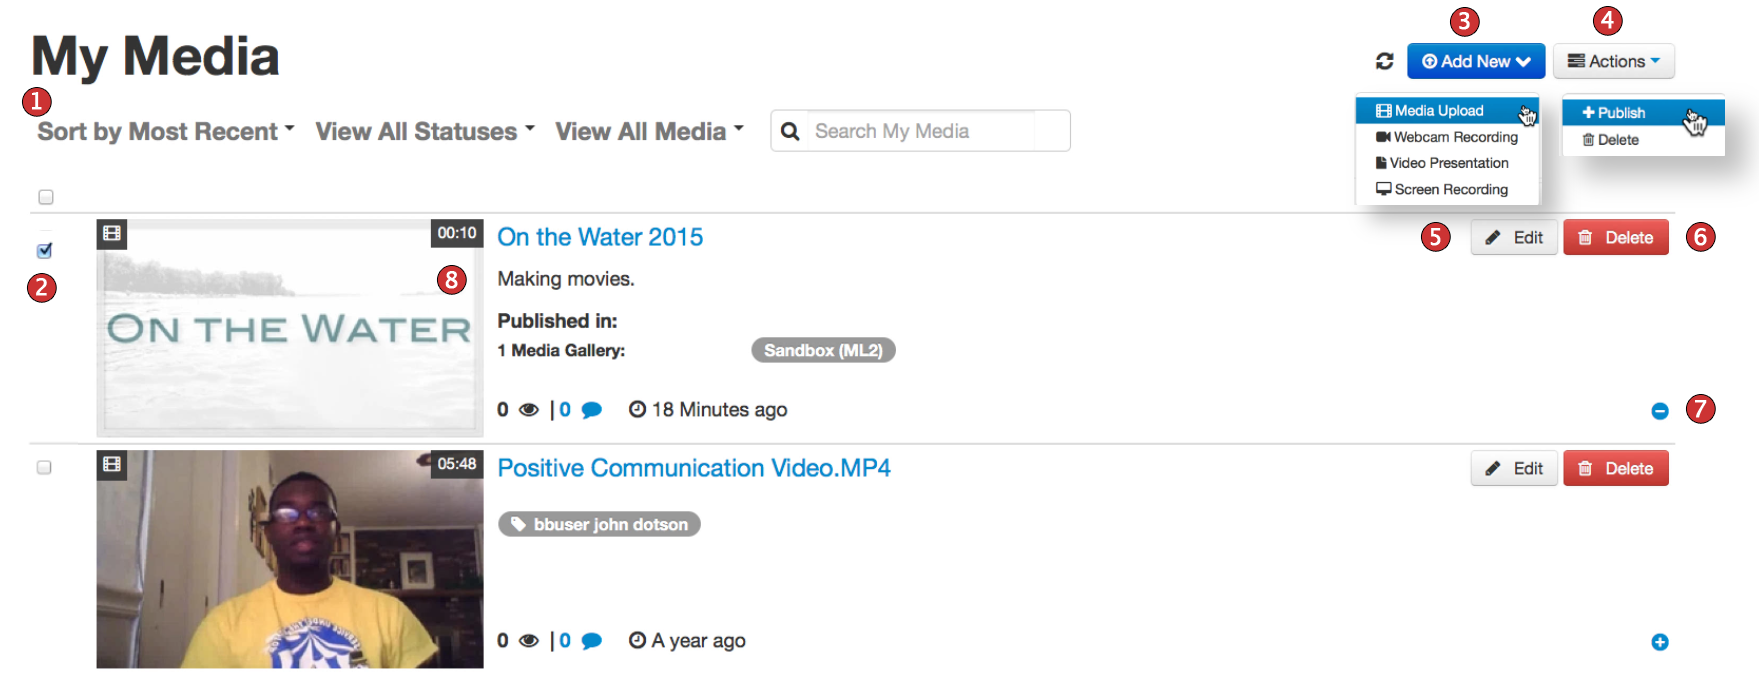
The My Media page serves as a private video gallery where you may upload, record, and manage your media content. Check out the diagram below for more information about what you can do on the My Media page.

My Media Options
| Reference | Description |
|---|---|
| 1 | Sort, filter, view, or search for media using tags. |
| 2 | Select one or more files to publish. |
| 3 | ADD NEW: Access Media Upload, Webcam Recording, Video Presentation, and Screen Recording options. |
| 4 | ACTION: Publish or delete media from the course. |
| 5 | Edit, select a thumbnail, create a clip, trim video, upload and manage captions, publish media items, or disable comments. |
| 6 | Delete media from the server. |
| 7 | Select to see where your media is published. |
| 8 | To view, the media click the image or link. |
