Step 1
Get Admitted to UA Little Rock:
Before registering for classes, you need to apply and get admitted. If you are transferring to UA Little Rock, you can also meet with a Transfer Advisor.
Step 2
Get Advised:
Getting advised is an important step in the registration process. After you’re admitted, your advisor will contact you about making an advising appointment, so check your UA Little Rock email and/or phone for a message. You can also contact your college’s advising center.
Step 3
Please familiarize yourself with important registration dates and deadlines, and learn some basic information about registration.
Register for classes in Workday Student
**IMPORTANT NOTE**
Students will NOT be able to register for classes until:
- They have completed their onboarding in Workday Student
- They have met with their advisors, and the advising flags have been lifted from their account
Learn More in the Getting Started section of the Workday Registration Guide below.
Workday Registration Guide
To get started with registration, students will need to make sure that they have:
- Been admitted for the semester in which they intend to sign up for classes.
- Met with their advisor to begin their degree plan and choose their classes for the semester. This will remove any Advising Hold that may prevent the student from registering for courses in Workday.
- Access to the Workday system for registration – If the student hasn’t logged into their Workday Student account yet, they should follow the Registration Guide located here.
Once the student has access to their account, there may be additional steps to complete, such as:
- Onboarding Hold – If this is the first time logging into Workday, students will have onboarding tasks they must complete before the Onboarding Flag can be removed.
These tasks can vary from student to student and will complete the student’s profile. The student cannot proceed to the registration process until the onboarding process is complete. - Advising Hold – Once the student completes the onboarding process, most will have an advising hold that must be cleared by their advisor every semester before course registration. Students must meet with their advisor before the hold can be lifted.
Once these holds are removed, most students can register for courses.
Select the “Academics Hub” link from the Home Page, either under the “Your Top Apps” section on the right side or from the “Menu” link in the top left corner of the page.


From here, students can get an overview of both their academic record and their registration status:

In addition to reviewing their current class schedule, students can also review:
- My Holds – any hold that will block registration will display here.
- Important Contacts – students can see their academic advisor’s information here and request an appointment (may vary by department policy for advising).
- Registration Appointments – this indicates when the student is allowed to register for the upcoming term(s)
From here, students can review their degree plan, see saved schedules or plans, and search for course selections by selecting the “Planning and Registration” option at the bottom of the Academics menu in the top left corner of the page.
PLEASE NOTE:
**The advising hold will not be removed from your account until you have met with your academic advisor. Please visit https://ualr.edu/advising/ to locate your advisor and make an appointment before attempting to register for courses.**
- Register from an Academic Plan – Your academic plan is a semester-by-semester guide that shows which courses you should take and when.
- Register from a Saved Schedule – If you have previously created a schedule and saved it in Workday, you can access it and start registration.
- Register from Find Course Section Report – To register for a particular course section while searching for it.
Method 1:
Registering From An Academic Plan
PLEASE NOTE:
**If you do not have the option to Register from Plan or receive any errors, please contact your academic advisor for assistance.**

Method 2:
Registering From A Saved Schedule
PLEASE NOTE:
**If you have not created a saved schedule, you will be unable to register for courses using this method.**

Method 3:
Register from the Find Course Section:
PLEASE NOTE:
**If you receive any errors or are unable to register for a course, please contact your academic advisor for support.**

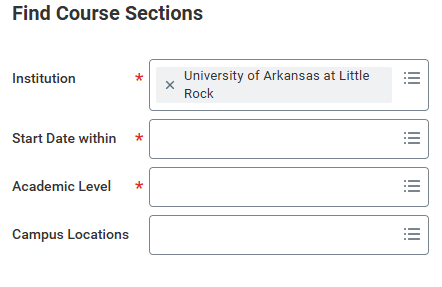
Complete the following steps to locate the correct course:

Institution: Click on the menu icon to the right of the box and select University of Arkansas at Little Rock if not already selected by default.
Start Date Within: Enter UALR xxxx 20xx to correlate with the correct semester and year (ex, UALR Fall 2025 or UALR Spring 2026). Select the correct result for the student’s semester and year.
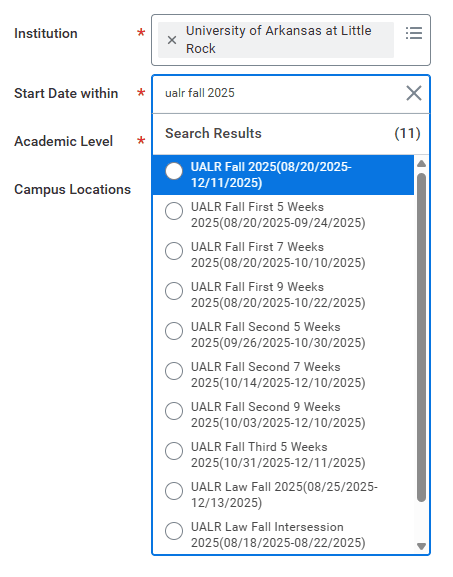
PLEASE NOTE: Typing is the best option here; the mouse options default to incorrect results.
Academic Level: Select the appropriate level for the student
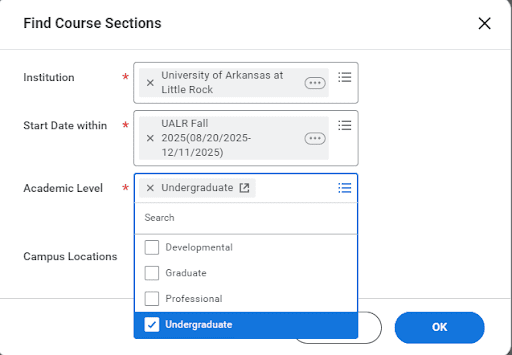
Campus Locations: Unnecessary at this time—there are currently no satellite campuses for UA Little Rock.
Complete the following steps to locate the correct course.
- Search by Subject Code:
These are four-letter codes that indicate the subject of the course. For example, NURS is nursing, and RELS is Religious Studies. Searching for a subject code by itself will show every course listed under that code - Search by Course Numbers:
The 5-digit number sequence after the subject code can also be used for searches – searching for “23000,” for example, will bring up every course and subject with that number. - Search by Course Title:
The title needs to be spelled correctly and be an exact match, or it will not display in search results. - Search by Keywords:
Even though the Course Title needs to be an exact match, partial keywords can bring up results that can aid in the search.
The toolbar on the left side of the page can be used to narrow the search by Subject, Open courses only, Online vs. In-person courses, etc.
PLEASE NOTE: To use the “Subject” list to refine the search, a correct subject code must be entered (i.e., NURS, RELS, MATH).
In the below figure, see a search for a course using the subject code CRJU (Criminal Justice):

How do I Drop/Withdraw?
You must drop or withdraw from courses through Workday Student.
Financial Aid
Dropping or withdrawing can impact your financial aid. Contact the Office of Financial Aid to determine how doing either could affect yours.
Drop/Withdraw Request
Further information can be found at Add, Drop, and Course Withdrawal.
Drop
From the Main Menu, click on Academics:
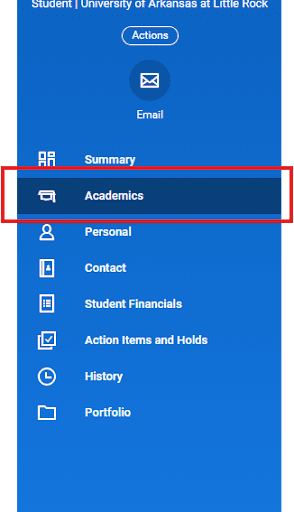
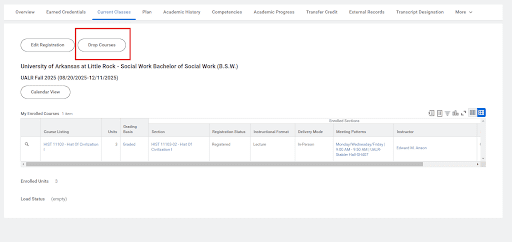
Under the Current Classes tab, click the Drop Course button:
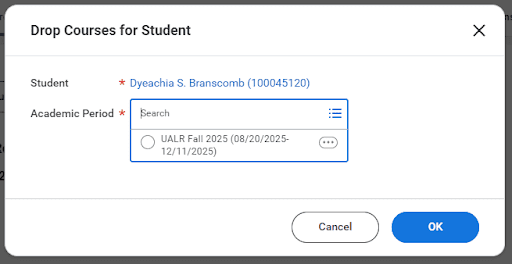
On the Drop Courses for Student Pop-Up, select the correct Academic Period:
On the Drop Course Menu, click the checkbox beside the class to drop from the student’s registered courses:

Check the Confirm box under the Registered Courses box and then click the blue OK button at the bottom of the page
**Ensure it is the correct class before confirming the drop**
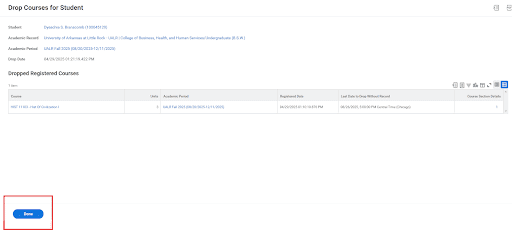
Review the Course Drop Information and click Done
Withdrawal
To withdraw from all courses, place a check beside all courses instead of one or two, click confirm, and click OK.
**Removing all courses from your academic schedule or a specific part of the term is a withdrawal. A grade of “W” will be received for the final course from which you withdraw during the late registration/adjustment period, but for all courses, withdrawal occurs after the late registration period has ended.**
After Registering for Classes
After you have been admitted, advised, and registered for classes, be sure to accept any financial aid awards, apply for scholarships, apply for housing if needed, get your textbooks, and more. Undergraduate students can look at our Quick Guide for more information. Remember that the earlier you apply for scholarships, the better.
It’s very important to view the payment deadlines so that you are not dropped from your courses. Visit Student Accounts to set up a payment plan if needed.
Training and Support
- If you need help completing any of these tasks in Workday, visit the Workday Training Materials for Students web page for more quick reference guides and training videos.
- If you need technical support to access Workday or other technical applications, contact our UA Little Rock IT help desk.
**Important note:
Blackboard will not be replaced by Workday. Students will continue to use Blackboard for course instruction and virtual learning.

