Blackboard is our web-based course management software used by instructors to build and manage online classes. This guide will help you get started setting up your courses.
If you have trouble finding the information you need, or if you have a question about something not included here, please feel free to contact us!
How To Copy Your Courses
When preparing for the start of a semester, you may plan to use content from a previous semester. The easiest way to accomplish this is by going to the old course and using the Course Copy function to copy the materials into a new course. This Quick Start Guide will explain how to copy the contents of a course from the old semester’s shell into a new shell.
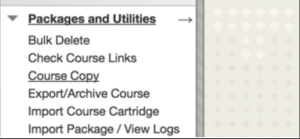
Step One: On the Control Panel, expand the Packages and Utilities menu and select Course Copy.
 Step Two: On the Copy Course page, click the Browse button to select the Destination Course ID. A popup window will open with a list of courses available to you in your account — select from this list the course into which you’d like to copy.
 Step Three: Click the Select All button to copy the entire course, or select specific items to copy into a new course by checking the boxes in the list.
 Note: Graded content like Assignments and Tests must be copied with their grade center columns, so you must select the ‘Grade Center Columns and Settings’ option along with these items, or else they won’t copy.
If you use the discussion board, you may wish to toggle the setting to ‘Include only the forums, with no starter posts’ to prevent having to remove posts from the previous semester in the current term.
Step Four: At the bottom of the page, choose Copy links and copies of the content (include the entire course home folder) and click Submit.
How To Merge Your Courses
Merging courses allows instructors to manage multiple sections from one shell. When merging sections the instructor will identify one of the sections to be the primary or “parent” course, and all enrollments from the sections known as “child” courses will be merged into the parent.
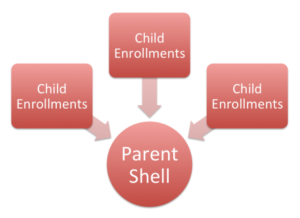
To merge a course:
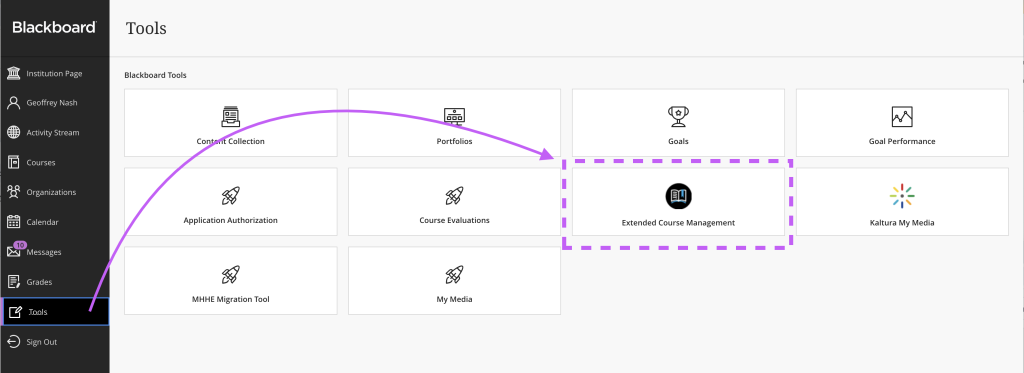
Access the tool: Visit ‘Tools’ on the Blackboard Base Navigation menu and select the ‘Extended Course Management’ tool.
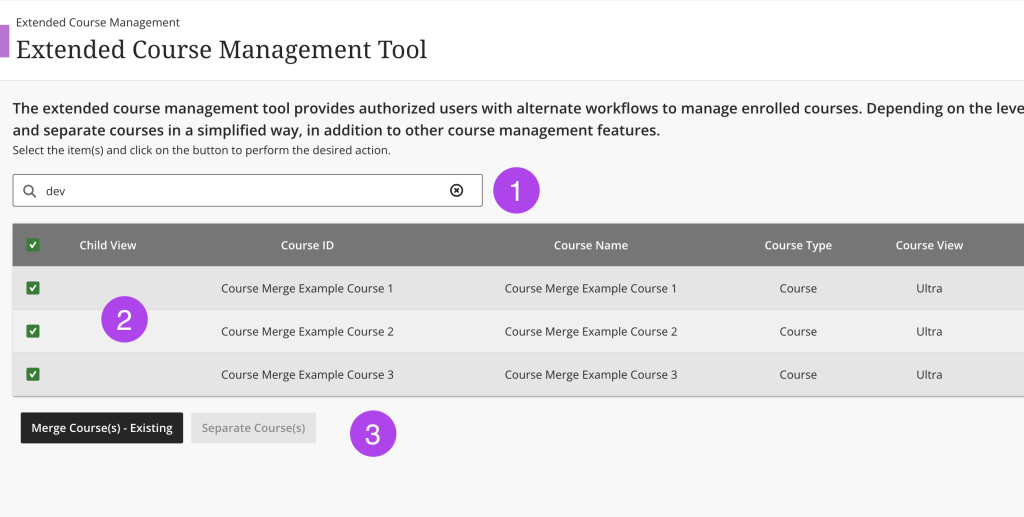
Select Courses: On the following page, you’ll find a list of courses associated with your account. To merge sections:
- You can use the search bar at the top of the page to filter the list.
- Locate the courses you wish to merge in the list and check the box next to the title of each.
- Once you’ve selected all of the courses you want to merge, click the ‘Merge Course(s)’ button at the bottom of the page.
Choose the parent section: After clicking the ‘Merge Course(s)’ button, a side panel will slide from the right side of the screen, prompting you to select the section you’d like to use as the parent. Select the parent course from the list and click ‘Merge’ on the bottom of the side panel to finalize your selection.
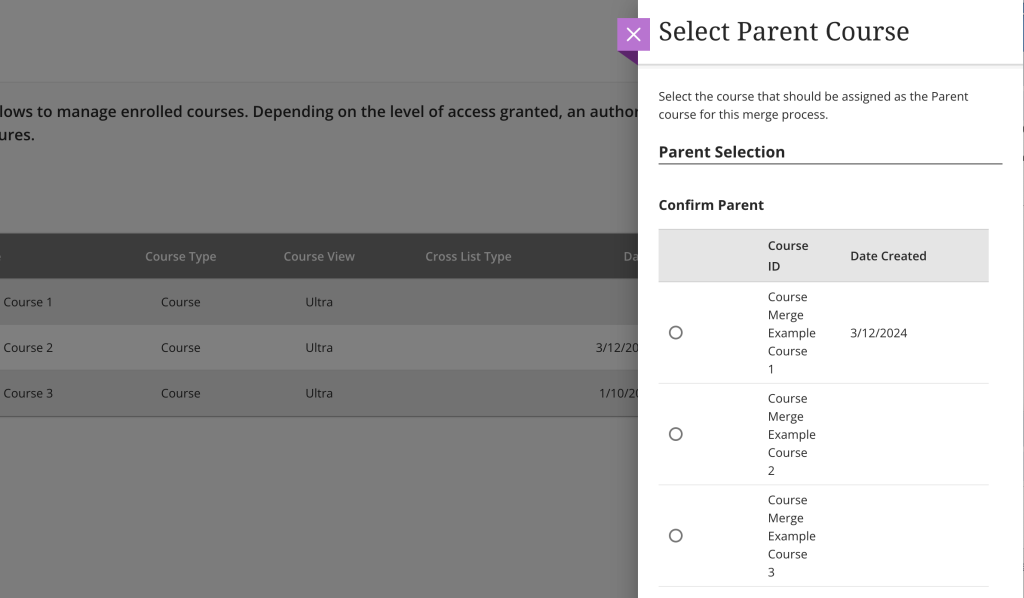
What section should I use as a parent? When merging courses, please be sure to select the section least likely to be canceled as the parent section to avoid issues that arise when a section is closed in Banner.
Can I merge courses from different terms? Though there is nothing to prevent you from merging courses from different terms, we strongly advise against doing this. If you are considering merging courses in this manner to address a problem, please reach out to elearning-support@ualr.edu for further assistance.
How To Make Your Courses Available to Students
There are two levels of availability related to a student’s access to a course. The first is enrollment availability, which is determined by the registration system. Beginning Fall 2020, student enrollments will become available one week prior to the first day of the term.
There is also a course availability setting that allows the course instructor to control whether students can access a particular course section once enrollments become available.
To adjust the availability setting for a course, just click the lock icon that appears at the top, right of the screen next to the ‘Edit’ button when you enter a course:
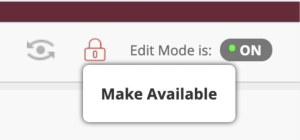 An unlocked icon means the course is available to students.
How To Backup a Course Taught in a Previous Semester
As each semester comes to a close, on the day that grades are due, courses taught in the term two years prior will be removed from the system. Once this date has passed, these courses will no longer be accessible from the Blackboard interface.
This removal is part of our archival process, which allows us to manage the amount of space used by inactive courses on the server. The current process keeps courses dating back six semesters, or two academic years, available through the myBlackboard interface. Here’s an example of this schedule:
| Semester | Removed from LMS |
|---|---|
| Spring 2014 | May 13, 2016 |
| Summer II 2014 | June 29, 2016 |
| Summer I 2014 | August 4, 2016 |
| Summer IV 2014 | August 10, 2016 |
If you want to retain a copy of a course for your own records, you can easily do so by archiving them yourself before the removal date and saving them to your computer. These archives are saved as a zip file that can later be imported into a blank course shell.
Learn more: How to Export and Archive Courses, How to Import Course Packages
How To Add Users To My Course
Most users are added to the courses in which they belong automatically by our enrollment script. Either the instructor of record or the department chair can also request the following types of access through the request form:
- Course Copy Access – allows users to copy course contents without being listed as the instructor.
- Viewer Access – provides view-only access to courses for faculty and department staff.
- Incomplete Access – students with an official incomplete can be added to a section of the course in the current term to finish collaborative work like group assignments and discussion boards.
Additional levels of access can be granted by providing a short narrative regarding the nature of the request.
You may also request access to a course by using the form. Once you’ve submitted a request, we will contact the appropriate party for permission and notify you once the request has been completed.
Please keep in mind, that we can’t add users as the instructor of a course; this must be assigned through Banner. Users in the student role must also be added to a course by the enrollment script, which happens automatically when they register for a course in BOSS.
Any additional roles that can access student records in the grade center — like Teaching Assistants and Course Coordinators — must be assigned to the course in Banner. Once assigned, these users will be automatically added to the course by the enrollment feeds.
How To Edit the Default Banner in Your Course
You can edit the banner that appears on the default template’s homepage by clicking the arrow next to the page title and selecting ‘Page Banner’ from the resulting menu:

This will open the text editor for that section of the page, where you can either adjust the wording by using the visual editor or opening the plain text editor to adjust the underlying code. Most prefer to do the former by highlighting the line they want to edit and typing over the default wording.
Creating Announcements
Blackboard Help – Creating Announcements
Creating Assignments
Blackboard Help: Creating Assignments
Navigating the course menu
Blackboard 101 – Navigating the Course Menu
This video offers an overview of the Blackboard course navigation menu.
Blackboard 101 – Adding Course Menu Items
This video walks you through the steps to add links to your course menu.
Adding Content
Blackboard Help: Add Course Content
Using the Grade Center
Grade Center Basics
This video provides and overview of the Blackboard Grade Center.
Using Blackboard Collaborate Ultra
Blackboard Collaborate with the Ultra Experience User Interface Tour
Blackboard Help: Collaborate Ultra Help for Moderators
Blackboard Help Video: Collaborate Ultra User Interface Tour
 PDF:
PDF: